SyntaxHighlighter JS

2013-11-24

WebLogic Server 12.1.2 and IntelliJ IDEA 11 not working

I performed a new install of WebLogic 12.1.2 on my Mac OSX. I could not get IntelliJ IDEA 11 to add it as a valid Application Server. The error I got was "Warning: Directory is not BEA home".

The new WebLogic 12.1.2 no longer creates registry.xml in the WebLogic home directory. This file had been created by WebLogic since at least version 8. Even WebLogic 12.1.1 created registry.xml.

To fix the WebLogic 12.1.2 and IDEA 11 incompatibility, I add the file registry.xml to the WebLogic home directory. (The WebLogic home directory is the one that contains the directory wlsserver)

The contents of registry.xml

<?xml version="1.0" encoding="UTF-8"?>
<bea-product-information>
  <host home="/Users/juttayaya/javadev/weblogic/wls12120" name="${env.HOST}">
    <product format="1.0" name="WebLogic Platform">
      <release level="12.1"
        ServicePackLevel="2" PatchLevel="0"
        Status="installed" BeaProgramGroup="BEA WebLogic Platform 12.1"
        StartMenu="" InstallTime="@INSTALL_TIME@"
        InstallDir="/Users/juttayaya/javadev/weblogic/wls12120/wlserver"
        JavaHome="/Library/Java/JavaVirtualMachines/jdk1.7.0_45.jdk/Contents/Home"
        JavaVersion="1.7.0" JavaVendor="@JAVA_VENDOR@">
        <component name="WebLogic Server" version="12.1.2.0">
          <component name="Server"/>
        </component>
     </release>
    </product>
    <java-installation Name="jdk170_45" JavaHome="@SUN_JAVA_HOME@" 
        JavaVersion="1.7.0" JavaVendor="Sun">
        <dependent-product Name="WebLogic Platform" Version="12.1.2.0"/>
    </java-installation>

 </host>
</bea-product-information>

2013-11-21

Java on Mac OSX

Notes to myself about Java on Mac OS X since I always forget and have to Google it every time.

  • How do you find all the Java installed on your Mac?
    /usr/libexec/java_home -V

  • How do you set JAVA_HOME to a specific version?
    export JAVA_HOME=`/usr/libexec/java_home -v 1.6`

  • How do you execute a specific version of Java to run?
    /usr/libexec/java_home -v 1.6 --exec javac -version

  • What is the difference between the Java in /System/Library and /Library?
    The Java in /System/Library is the version of Java from Apple. Apple uses it for its system runtime so do not touch or modify it.  The Java in /Library is what you installed from Sun.

  • Where do you put Java Extensions?
    In directory /Library/Java/Extensions

2013-11-20

Auditing Unix input/output

When accessing a customer's Unix server, it is helpful to allow the customer to audit the commands you execute on the server.

To log all your command line inputs and output to a file, use the command

script filename

This will log all your inputs and output into a log file named filename. (Of course replace filename with whatever you want the file name to be).

To finish with logging your commands, type

exit

To share a Unix screen terminal, so the customer can see your inputs and output in real-time, use the screen command.

  1. You and the customer log in as the same Unix user in ssh
  2. You type in the command

    screen -d -m -S myscreenname
    screen -x myscreenname

    (Of course replace myscreenname with whatever you want the screen name to be).
  3. The customer types the command

    screen -x myscreenname
  4. To finish with sharing your Unix terminals, type in the command

    exit
The great feature of screen is that the customer can type in commands from his Unix terminal and you can see the output on your screen. It is an excellent way to do pair-administration.

If you want to use both script and screen at the same time, run the screen command first. The script command will not record the screen inputs/outputs if it is executed first.

How to get rid of color in ls

 Many Unix administrators will force the command  "ls" to automatically output with colors by adding the following alias to the ~/.bashrc

alias ls='ls --color'

To make "ls" not display colors for your session, type in the follow command at the command prompt

unalias ls

2013-11-17

Oracle PL/SQL best practice: Select statements

Question:
What is the best way to do SQL select statements in Oracle PL/SQL?

Answer:
For best performance of select statements returning many rows, use the PL/SQL fetch bulk collect with limit.

DECLARE
    CURSOR hr_employees_cur IS
        SELECT first_name, last_name, hire_date, salary
        FROM hr.employees;
        
    TYPE hr_employees_rec IS record(
        first_name hr.employees.first_name%TYPE,
        last_name hr.employees.last_name%TYPE,
        hire_date hr.employees.hire_date%TYPE,
        salary hr.employees.salary%TYPE
    );
    
    batchSize CONSTANT PLS_INTEGER := 100;    
    TYPE hr_employees_vat IS VARRAY(100) OF hr_employees_rec;    
    hr_employees hr_employees_vat;
    
BEGIN
    OPEN hr_employees_cur;
    LOOP
        FETCH hr_employees_cur BULK COLLECT INTO hr_employees LIMIT batchSize;
        FOR i IN 1 .. hr_employees.COUNT()
        LOOP
            IF ( hr_employees(i).salary > 10000 AND
                 hr_employees(i).hire_date > TO_DATE('15-04-1999', 'DD-MM-YYYY') )
            THEN
                sys.dbms_output.put_line(
                  'New employee over salary limit: ' || 
                   hr_employees(i).first_name || 
                   ' ' || 
                   hr_employees(i).last_name);
            ELSIF ( hr_employees(i).salary < 2400 AND
                    hr_employees(i).hire_date > TO_DATE('15-04-1999', 'DD-MM-YYYY') )
            THEN
                sys.dbms_output.put_line(
                  'New employee under salary limit: ' || 
                   hr_employees(i).first_name || 
                   ' ' || 
                   hr_employees(i).last_name);                     
            END IF;
        END LOOP;
        
        EXIT WHEN hr_employees.COUNT() < batchSize;
    END LOOP;
    
    CLOSE hr_employees_cur;

END;

Notes:
  1. Fetch bulk collect performs the best because it reduces context switching between the PL/SQL and SQL engine. When PL/SQL executes a SQL statement, like in a select SQL fetch, the PL/SQL engine has to pass the processing to the separate SQL engine.  The passing of processing between the PL/SQL and SQL engine is called context switching and it is CPU expensive. Executing a 10,000 row select fetch in a loop results in 10,000 context switches.  Bulk collect fetch batches multi-row select fetches into 1 context switch.
  2. Limit is needed so the bulk collect fetch does not consume excessive per-session memory for select queries that returns a large number of rows.
  3. A batch size of 100 is a good balance between memory and performance. Increasing the batch size above 100 usually leads to diminishing returns in performance.
  4. Unfortunately, Oracle VARRAY does not accept a variable as its initial size.
  5. Oracle recommends exiting the loop via the VARRAY.COUNT instead of CURSOR%NOTFOUND.
  6. Oracle 10g by default (plsql_optimize_level=2) optimizes cursor for-loops to speeds comparable to fetch bulk collect with limit of 100 and with less code.  If you do not need to tune the bulk collect limit size, the cursor for-loop is a good compromise between fast code creation/maintainability and runtime performance.

    The above example using cursor for-loops
DECLARE
    CURSOR hr_employees_cur IS
        SELECT first_name, last_name, hire_date, salary
        FROM hr.employees;
BEGIN
    FOR hr_employees_rec IN hr_employees_cur
    LOOP
            IF ( hr_employees_rec.salary > 10000 AND
                 hr_employees_rec.hire_date > TO_DATE('15-04-1999', 'DD-MM-YYYY') )
            THEN
                sys.dbms_output.put_line(
                  'New employee over salary limit: ' || 
                   hr_employees_rec.first_name || 
                   ' ' || 
                   hr_employees_rec.last_name);
            ELSIF ( hr_employees_rec.salary < 2400 AND
                    hr_employees_rec.hire_date > TO_DATE('15-04-1999', 'DD-MM-YYYY') )
            THEN
                sys.dbms_output.put_line(
                  'New employee under salary limit: ' || 
                   hr_employees_rec.first_name || 
                   ' ' || 
                   hr_employees_rec.last_name);                     
            END IF;    
    END LOOP;
END;

Sources:

2013-06-01

Unique Integer Sorting

Question:
Given a file with a set of unique (non-repeating) integers from 1 to 1,0000,000 , how would you sort it?

For example, if the input file contained

420
2001
23
90210
1492

the output should be

23
420
1492
2001
90210

Solution:
This is one of my favorite interview questions since it shows how the interviewee approaches a fairly simple and common sorting problem.

The best answer in my opinion is to use a bit array.  When the words "unique integer" appears, a bit array should be one of your solution considerations. The basic algorithm is

1. Initialize a bit array to a size of 1,000,000 with all the values of 0.
2. Read each number from the file.
3. For each number, set the bit array index for that number to 1. For example, for the number 420, you would set bit_array[420] = 1 . For 2001,you would bit_array[2001] = 1;
4. Once all the numbers are processed, loop through the bit array and output all the indexes that have a value of 1. That is your sorted list of numbers.

In Java, there is a built-in BitSet implementation of a bit array.

// 1. Initialize bit array
final BitSet bitSet = new BitSet(1000000);
        

// 2. Read each number
final int[] intInput = {420, 2001, 23, 90210, 1492};
 

// 3. Set bit array index with each number from step 2
for (int i : intInput) {
    bitSet.set(i);
}
        

// 4. Loop through bit array and display all set values
for(int i = bitSet.nextSetBit(0); i >=0; i = bitSet.nextSetBit(i+1) ) {
    System.out.print(i + "\n");    
}

The algorithm is easy to understand and implement. It is also fast and does not require a lot of memory.

This question comes from the first chapter of Jon Bentley's book, Programming Pearls . It is a book every good programmer should read

2013-05-29

Convert InputStream to String in two lines of code

Below is code to convert from java.io.InputStream into a String in just two line of Java 5 code.

public static String convertToString(InputStream in) {
    java.util.Scanner s = new java.util.Scanner(in).useDelimiter("\\A");
       
    return s.hasNext() ? s.next() : "";

}

Idea taken from "Stupid Scanner tricks"

2013-05-25

DDD: Application File Structure


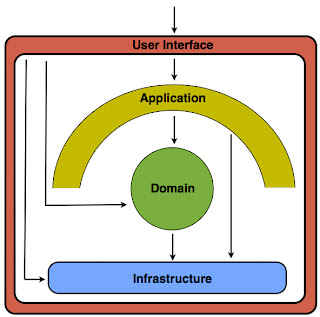
I am a fan of Domain Driven Design. The following is how I structure Java applications to support DDD concepts.

Domain Layer
The domain layer is core of DDD. It contains the business objects state, behavior, and interaction. The domain object source code is contained in the the base.package.domain package, e.g. com.jirawat.myappname.domain package.

  • Aggregate
    The aggregate is a collection of associated objects that are bounded together to represent one consistent concept in a domain.

    From a programming perspective, aggregates represent one consistent unit for data change, enforcing data integrity and invariants. For example, the concept of a customer can be represented by a customer aggregate. The aggregate is modeled in the source code with packages. The customer aggregate is modeled in the package com.jirawat.myappname.domain.model.customer.
  • Aggregate Root
    The aggregate root is the only external access point into the aggregate. Data access and changes to the other classes in the aggregate goes through the aggregate root. This allows the aggregate root to validate data integrity.

    For example, the customer aggregate contains the Customer, Address, and ContactInfo classes. To access the classes in the customer aggregate, external clients will only reference the Customer object, which is the aggregate root. To change the address of a customer, the external client uses the customer.changeAddress method. To enforce the business rule that a customer must have one and only one address, the customer.changeAddress method throws an IllegalArgumentException if a null Address is passed as a parameter. The aggregate root is documented in the package-info.java Javadoc.

    If an class is an aggregate root, it is further documented in that class Javadoc. To programmatically enforce that external access is limited only to the aggregate root, the constructors of the classes that are not an aggregate root can be set to package-private. To ensure that external clients do not accidentally modify references to non-aggregate root objects, an immutable or defensive copy should be returned (Item 39: Effective Java).
  • Entity
    An entity has one unchanging, unique identity throughout the lifecycle of the object. Equivalently, two entities are equal if the identity is the same, even though the other attributes may be different.

    A customer with an ID of 101 is the same customer even though the customer's last name may have changed at some point in the object lifecycle. All entities implement the Entity interface. The code for the Entity interface is shown below.
    public interface Entity<T,ID> {
        /**
         * All entities must have an identity
         * @since 1.0
         *
         * @return The identity of the entity
         */
        ID identity();
    
        /**
         * Entities compare by identity, not by attributes.
         * @since 1.0
         *
         * @param otherEntity The other entity to be compared for equality.
         * @return {@code true} if the identities are the same, 
         *   even though the other entity attributes are different.
         */
        boolean equalIdentityAs(T otherEntity);
    
        /**
         * Per Item 9: Effective Java, this method is to remind developers that 
         * hashCode should be consistent
         * with equals. Since entity equality is defined by the identity only, 
         * the hashCode should be generated
         * from the identity only also.
         * @since 1.0
         *
         * @return The hashCode derived from the entity identity
         */
        int hashCodeFromIdentity();
    }
    
  • Value Object
    A value object does not have an identity. It is defined by the values of its attributes. Equivalently, two value objects are equal if all the attributes are the same.

    Two address objects both with the value of "123 Main St, Anywhere, MA 01730" are considered equal. This is important when comparing to see if two different customers have the same address. From an internal implementation perspective, these two addresses may be different rows in a relational database with different primary keys. But from a business perspective, these two value objects are equal since the address attributes are equal. All value objects implement the ValueObject interface. The code for the ValueObject interface is shown below.
    public interface ValueObject<T> {
        /**
         * Value Objects compare by attributes, not by identity.
         * @since 1.0
         *
         * @param otherValueObject The other value object to be compared
         *     for equality.
         * @return {@code true} if the attributes of both value objects
         *     are the same.
         */
        boolean equalValueAs(T otherValueObject);
    
        /**
         * Per Item 9: Effective Java, this method is to remind developers 
         * that hashCode should be consistent
         * with equals. Since value object equality is defined by values of 
         * its attributes,
         * the hashCode should be generated from the attribute values also.
         * @since 1.0
         *
         * @return The hashCode derived from the attribute values
         */
        int hashCodeFromValue();
    
        /**
         * This is to emphasize to the developer that when an aggregate root
         * passes a reference of a internal Value Object, it should either 
         * be a defensive copy (Item 39: Effective Java)
         * or, even better, an immutable object (Item 15: Effective Java)
         * <p />
         * This prevents accidental modification of an aggregate root 
         * invariant by accessing the Value Object reference
         * @since 1.0
    
         * @return A safe copy of the Value Object
         */
        T copy();
    
  • Factory
    A factory is a class specifically designed to create other new objects.

    For example, the class CustomerFactory can be used to create new Customer objects. This can make sense from a code standpoint especially if customer creation is complex. To create a customer, business logic may dictate that postal address validation may required. It makes more sense to have the address validation proxy stubs in a CustomerFactory class instead of in the Customer object, since address validation only used during customer creation. From an object-oriented responsibility standpoint, since customer creation requires the construction of Address and ContactInfo objects, it is proper to create a new class to coordinate the creation of all three classes for the Customer aggregate root. Additional benefits/drawbacks of factories can be found in Item 1: Effective Java.

    All factories implement the Factory interface. The Factory interface is just a marker interface (Item 37: Effective Java) with no method declarations. Because there are so many ways to create objects depending on the application specific business rules, it does not make sense to define a generic object creation method. The main benefit of using the Factory marker interface is that in an IDE, I can list all the implementing classes of Factory to see all the factories in a project.

    Factory classes will live in the same aggregate package as the class it creates. CustomerFactory lives in the package com.jirawat.myappname.domain.model.customer. It is annoying to expand multiple directories or different modules when attempting to understand a context. As a new developer reading foreign code for the first time, when I need to understand the customer context, I just want to look at the com.jirawat.myappname.domain.model.customer package directory and see all the entities, value object, factories, and repositories responsible for the customer bound in one place.

    Like any good thing, do not overuse factories. If the object creation logic is simple and does not reference a lot of other Entities or Value Objects, then just create a normal constructor on the class.
  • Repository
    A repository is responsible for saving and retrieving objects from the data store. The common JEE term for repository is DAO (Data Access Object).

    In a majority of applications, a repository is saving the state of a object via INSERT/UPDATE/DELETE and SELECT on a SQL database. All repositories implement the Repository interface. Like Factory, the Repository interface is usually a marker interface. The reason the Respository interface does not have generic methods like find(), findAll(), and store() is because some object repository may be read-only (no store method) or sometimes even write-only like logging events to a database table. I am not a big fan of using UnsupportedOperationException as I consider that a sign of a poorly planned interface.

    Lately with rise of Command Query Responsibility Segregation, I have been experimenting with using the interfaces CommandRepository, QueryRepository, and Repository, as shown in the code below.
    public interface CommandRespository<T> {
        /**
         * Save Object of Type T into the data store
         *
         * @param storeObject Object of Type T to save into data store
         */
        void store(T storeObject);
    }
    
    
    public interface QueryRespository<T> {
        /**
         * Find Type T from the data store using Key K
         *
         * @param key
         * @return Object of Type T if found, else {@code null}
         */
        T find(K key);
    }
    
    public interface Repository<T> extends CommandRespository<T>, QueryRespository<T> {
        
    }
    
    Like Factory, the Repository will live in the same aggregate package as the class it is responsible for. The CustomerRepository lives in the com.jirawat.myappname.domain.model.customer package. The CustomerRepository is an interface that extends Repository interface. The actual Repository implementation will live in the persistence infrastructure package, com.jirawat.myappname.infrastructure.persistence. This allows us to swap repository implementation depending on the situation.

    For example, in production we can use Hibernate connected to a relational database by placing the implementation in com.jirawat.myappname.infrastructure.persistence.hibernate. In unit testing, we can swap out the hibernate implementation with an in-memory model using the com.jirawat.myappname.infrastructure.persistence.inmem package. By having the client use the CustomerRepository interface, we do not have to modify the client code when we swap datastore implementations.
  • Service
    A domain service is a stateless class that coordinates business logic between different aggregates in the domain. Operations are put in a domain service when it is not an appropriate responsibility for any one entity or value object. Domain services should only use other domain entities and value objects. If the services uses any other layers like infrastructure, it probably belongs as an application service.

    Services are often abused in JEE development.Methods that should logically reside in the Entity or Value Object are placed in the service layer. As an example, the calcuateTotalPrice method is erroneously placed in the OrderService object instead of correctly residing in the Order entity itself.

    Another form of abuse is wrapping access to the repository (DAO) without any functional additions. A contrete sample of this is a CustomerService.findCustomer method that
    delegates to the CustomerDAO.findCustomer method, without any further logic. The delegation serves no purpose and leads to extraneous, useless code. It is perfectly acceptable
    to invoke CustomerDAO.findCustomer directly.

    All domain services are grouped under one service package, e.g. com.jirawat.myappname.service.
  • Domain Event
    An domain event is an unique situation that is important to the domain.

    Events are common when using an asynchronous messaging system. When an order is delivered to the customer, the delivery system can send an OrderDeliveredEvent.

    Events implement the DomainEvent interface. The code for the DomainEvent interface is shown below
  • public interface DomainEvent<T> {
    
      /**
       * Compare if two domain events are the same. 
       * Depending on the event implementation, there may be an event ID to compare
       * or the comparision may happen by the event attributes like timestamp.
       * @since 1.0
       * 
       * @param other The other domain event.
       * @return {@code true} if the other event and this event are the same
       */
      boolean equalEventAs(T otherEvent);
    }
    

Infrastructure Layer
The infrastructure layer is where you integrate with the third party frameworks such as Hibernate and Spring.

Persistence is the most common functionality in the infrastructure layer. All persistence code is located in the infrastructure persistence package. For Hibernate, the persistence package would be com.jirawat.myappname.infrastructure.persistence.hibernate .

Application Layer
The application layer is a thin layer to coordinate the usage of domain objects.

The application layer does not have any business logic and it should not hold any domain state. The application layer is where you would implement transactions.

The package name of the application layer is com.jirawat.myappname.application.

User Interface Layer
The User Interfaces layer is code to support the input/output commands for the application.

Generally the UI will be a HTML web application for the browser but that does not have to be the only type of user interface. Web services, JMS, and rich client are also included in the user interfaces layers.

The base package for the user interfaces layer is com.jirawat.myappname.interfaces . Then each section will have its own package. A customer web UI interface is in the package com.jirawat.myappname.interfaces.customer.web while an ordering web service is in the com.jirawat.myappname.interfaces.order.ws package.

2013-03-13

xmllint: Format and Validate XML on Unix

xmllint can be used in Unix to format and validate XML.

  • How do I pretty format XML?
    xmllint --output newFile.xml --format oldFile.xml

  • How do I use tabs instead of spaces to format XML?
    XMLLINT_INDENT=$'\t' xmllint --output newFile.xml --format oldFile.xml

  • How do I validate an XML against a DTD?
    xmllint --dtdvalid http://java.sun.com/j2ee/dtds/web-app_2_2.dtd web.xml

  • How do I validate against a XSD schema?
    xmllint --debugent --schema http://java.sun.com/xml/ns/j2ee/web-app_2_4.xsd web.xml 

2013-03-12

Android ListView Tutorial: simple_list_item_2 and SimpleAdapter

This tutorial demonstrates how to display an array of Java enum in the Android UI. This example is also applicable if using an array or List of JavaBeans or plain Java Objects.

Core Concepts Covered
  1. Use the built-in android.R.layout.simple_list_item_2 to create an Android UI List.
  2. Use android.widget.SimpleAdapter to display an array of Java enum in the Android UI List.
Summary Technical Steps
  1. Create class extending android.app.ListActivity.
  2. Obtain data as an array of Java enum entries.
  3. Convert the array of enum into a List<Map<String, String>> format that will be used by the android.widget.SimpleAdapter constructor.
  4. Create an android.widget.SimpleAdapter that connects the List<Map<String, String>> data to android.R.layout.simple_list_item_2.
  5. Bind the android.widget.ListAdapter using the ListActivity.setListAdapter method.
Detailed Technical Steps

1. Create class extending android.app.ListActivity.

public class MainActivity extends ListActivity {

    @Override
    protected final void onCreate(final Bundle savedInstanceState) {
        super.onCreate(savedInstanceState);
    }
}
    2. Obtain data as an array of Java enum entries, using the built-in enum method values(), e.g. UsState.values() .
    For this tutorial, we will use an enum containing the 13 US original colonies. View the full UsState.java code listing.

    public enum UsState {
        DE("Delaware"),
        PA("Pennsylvania"),
        NJ("New Jersey");

           private String stateName;

        private UsState(final String name) {
            this.stateName = name;
        }

        public String getStateName() {
    return this.stateName;
        }

        public String getAbbreviation() {
    return this.name();
        }

    }

    3. Convert the array of enum into a List<Map<String, String>> format that will be used by the android.widget.SimpleAdapter constructor.

    private static final String TEXT1 = "text1";
    private static final String TEXT2 = "text2";

    private List<Map<String, String>> convertToListItems(final UsState[] states) {
        final List<Map<String, String>> listItem =
          new ArrayList<Map<String, String>>(states.length);

        for (final UsState state: states) {
            final Map<String, String> listItemMap = new HashMap<String, String>();
    listItemMap.put(TEXT1, state.getStateName());
    listItemMap.put(TEXT2, state.getAbbreviation());
    listItem.add(Collections.unmodifiableMap(listItemMap));
        }

        return Collections.unmodifiableList(listItem);
    }

    The convertToListItems method converts an array of UsState into a List of Map. The List of Map will be used as part of the constructor for a SimpleAdapter.

    Each element in the List will correspond to a row in the Android UI list. The Map<String, String> maps the attributes on the Object to the android.R.id.text1 and android.R.id.text2 UI fields.

    For example, if you input
    UsState[] =
        [ DE("Delaware"),
          PA("Pennsylvania"),
          NJ("New Jersey")
        ];

    the output will be
    List<Map<String, String>> =
        [ {text1="Delaware", text2="DE"},
          {text1="Pennsylvania", text2="PA"},
          {text1="New Jersey", text2="NJ"}
        ];
       
    4. Create an android.widget.SimpleAdapter in the ListActivity class from step 1 that connects the List<Map<String, String>> data to android.R.layout.simple_list_item_2.

    private ListAdapter createListAdapter(final UsState[] states) {
        final String[] fromMapKey = new String[] {TEXT1, TEXT2};
        final int[] toLayoutId = new int[] {android.R.id.text1, android.R.id.text2};
        final List<Map<String, String>> list = convertToListItems(states);

        return new SimpleAdapter(this, list,
                              android.R.layout.simple_list_item_2,
                                 fromMapKey, toLayoutId);
    }


    In the createListAdapter method, the constructor of the SimpleAdapter binds the keys from the Map<String, String> created in convertToListItems to the android.R.id.text1 and text2. It associates "text1" from the fromMapKey array to the android.R.id.text1 in the toLayoutId array. When the ListView needs to show text for the android.R.id.text1 ID, it executes a Map.get("text1") to get the String value to display, e.g. Delaware.
       
    5. Bind the android.widget.ListAdapter using the ListActivity.setListAdapter method.

    public class MainActivity extends ListActivity {

        @Override
        protected final void onCreate(final Bundle savedInstanceState) {
            super.onCreate(savedInstanceState);

    final UsState[] states = UsState.values();
            final ListAdapter listAdapter = createListAdapter(states);
            setListAdapter(listAdapter);
        }
    }

    View the full MainActivity.java code listing.

    The final result will look like this


    Source Code: Git | SVN | Download Zip

    Android ListView Tutorial: simple_list_item_1

    This tutorial demonstrates how to display a Java List of Strings in the Android UI. This example is also applicable if using an array of Strings.

    Core Concepts Covered
    1. Use the built-in android.R.layout.simple_list_item_1 to create an Android UI List.
    2. Use android.widget.ArrayAdapter to display a List of Strings data in the Android UI List.
    Summary Technical Steps
    1. Create class extending android.app.ListActivity.
    2. Obtain data in List of Strings data structure.
    3. Create an android.widget.ArrayAdapter that connects the List of Strings data to android.R.layout.simple_list_item_1.
    4. Bind the android.widget.ListAdapter using the ListActivity.setListAdapter method.
    Detailed Technical Steps

    1. Create class extending android.app.ListActivity.

    public class MainActivity extends ListActivity {

        @Override
        protected final void onCreate(final Bundle savedInstanceState) {
            super.onCreate(savedInstanceState);
        }
    }
      2. Obtain data in List of String data structure.
      For this tutorial, we will use a List of Strings containing the 13 US original colonies. View the full UsState.java code listing.

      public final class UsState {
          public static final List<String> ORIGINAL_COLONIES = initColonies();

          private UsState() { }

          private static List<String> initColonies() {
              final List<String> colonies = new ArrayList<String>();
              colonies.add("Delaware");
              colonies.add("Pennsylvania");
              colonies.add("New Jersey");

              return Collections.unmodifiableList(colonies);
          }
      }
         
      3. Create an android.widget.ArrayAdapter in the ListActivity class from step 1 that connects the List of Strings data to android.R.layout.simple_list_item_1.

          private ListAdapter createListAdapter(final List<String> list) {
              return new ArrayAdapter<String>(this, android.R.layout.simple_list_item_1, list);
          }

      4. Bind the android.widget.ListAdapter using the ListActivity.setListAdapter method.

      public class MainActivity extends ListActivity {

          @Override
          protected final void onCreate(final Bundle savedInstanceState) {
              super.onCreate(savedInstanceState);
              final ListAdapter listAdapter = createListAdapter(UsState.ORIGINAL_COLONIES);
              setListAdapter(listAdapter);
          }
      }

      View the full MainActivity.java code listing.

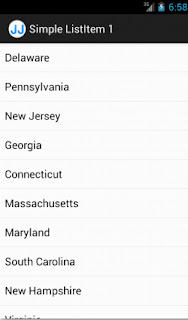
      The final result will look like this


      Source Code: Git | SVN | Download Zip

      2013-03-07

      Built-in Android ListView layouts: Part 2

      See Part 1 here.
      Android has several built-in ListView layouts that you can easily use without defining your own layout XML.

      The source code needs cleanup and better documentation but it should give you an idea how to use the built-in layout.

      android.R.layout.simple_list_item_activated_1
      Source Code: Git | SVN
      <?xml version="1.0" encoding="utf-8"?>
      <TextView
        xmlns:android=
        "http://schemas.android.com/apk/res/android"
        android:id="@android:id/text1"
        android:layout_width="match_parent"
        android:layout_height="wrap_content"
        android:textAppearance=
        "?android:attr/textAppearanceListItemSmall"
        android:gravity="center_vertical"
        android:paddingStart=
        "?android:attr/listPreferredItemPaddingStart"
        android:paddingEnd=
        "?android:attr/listPreferredItemPaddingEnd"
        android:background=
        "?android:attr/activatedBackgroundIndicator"
        android:minHeight=
        "?android:attr/listPreferredItemHeightSmall"
      />


      android.R.layout.simple_list_item_activated_2
      Source Code: Git | SVN
      <?xml version="1.0" encoding="utf-8"?>
      <TwoLineListItem
        xmlns:android=
        "http://schemas.android.com/apk/res/android"
        android:paddingTop="2dip"
        android:paddingBottom="2dip"
        android:layout_width="match_parent"
        android:layout_height="wrap_content"
        android:background=
        "?android:attr/activatedBackgroundIndicator"
        android:minHeight=
        "?android:attr/listPreferredItemHeight"
        android:mode="twoLine"
      >
      
        <TextView android:id="@android:id/text1"
          android:layout_width="match_parent"
          android:layout_height="wrap_content"
          android:layout_marginStart=
          "?android:attr/listPreferredItemPaddingStart"
          android:layout_marginTop="6dip"
          android:textAppearance=
          "?android:attr/textAppearanceListItem"
        />
      
        <TextView android:id="@android:id/text2"
          android:layout_width="match_parent"
          android:layout_height="wrap_content"
          android:layout_below="@android:id/text1"
          android:layout_alignStart="@android:id/text1"
          android:textAppearance=
          "?android:attr/textAppearanceSmall"
        />
      
      </TwoLineListItem>


      android.R.layout.simple_list_item_checked
      Source Code: Git | SVN
      <?xml version="1.0" encoding="utf-8"?>
      <CheckedTextView
        xmlns:android=
        "http://schemas.android.com/apk/res/android"
        android:id="@android:id/text1"
        android:layout_width="match_parent"
        android:layout_height=
        "?android:attr/listPreferredItemHeightSmall"
        android:textAppearance=
        "?android:attr/textAppearanceListItemSmall"
        android:gravity="center_vertical"
        android:checkMark="?android:attr/textCheckMark"
        android:paddingStart=
        "?android:attr/listPreferredItemPaddingStart"
        android:paddingEnd=
        "?android:attr/listPreferredItemPaddingEnd"
      />


      android.R.layout.simple_list_item_multiple_choice
      Source Code: Git | SVN
      <?xml version="1.0" encoding="utf-8"?>
      <CheckedTextView
        xmlns:android=
        "http://schemas.android.com/apk/res/android"
        android:id="@android:id/text1"
        android:layout_width="match_parent"
        android:layout_height=
        "?android:attr/listPreferredItemHeightSmall"
        android:textAppearance=
        "?android:attr/textAppearanceListItemSmall"
        android:gravity="center_vertical"
        android:checkMark=
        "?android:attr/listChoiceIndicatorMultiple"
        android:paddingStart=
        "?android:attr/listPreferredItemPaddingStart"
        android:paddingEnd=
        "?android:attr/listPreferredItemPaddingEnd"
      />


      android.R.layout.simple_list_item_single_choice
      Source Code: Git | SVN
      <?xml version="1.0" encoding="utf-8"?>
      <CheckedTextView
        xmlns:android=
        "http://schemas.android.com/apk/res/android"
        android:id="@android:id/text1"
        android:layout_width="match_parent"
        android:layout_height=
        "?android:attr/listPreferredItemHeightSmall"
        android:textAppearance=
        "?android:attr/textAppearanceListItemSmall"
        android:gravity="center_vertical"
        android:checkMark=
        "?android:attr/listChoiceIndicatorSingle"
        android:paddingStart=
        "?android:attr/listPreferredItemPaddingStart"
        android:paddingEnd=
        "?android:attr/listPreferredItemPaddingEnd"
      />


      android.R.layout.two_line_list_item
      Source Code: Git | SVN
      <?xml version="1.0" encoding="utf-8"?>
      <LinearLayout
        xmlns:android=
        "http://schemas.android.com/apk/res/android"
        android:layout_width="match_parent"
        android:layout_height="wrap_content"
        android:orientation="vertical">
      
        <TextView android:id="@android:id/text1"
        android:textSize="16sp"
        android:textStyle="bold"
        android:layout_width="match_parent"
        android:layout_height="wrap_content"
        />
      
        <TextView android:id="@android:id/text2"
        android:textSize="16sp"
        android:layout_width="match_parent"
        android:layout_height="wrap_content"
        />
      
      </LinearLayout>
      

      Built-in Android ListView layouts: Part 1

      See Part Two here.
      Android has several built-in ListView layouts that you can easily use without defining your own layout XML.

      The source code needs cleanup and better documentation but it should give you an idea how to use the built-in layout.

      android.R.layout.activity_list_item
      Source Code: Git | SVN
      <?xml version="1.0" encoding="utf-8"?>
      <LinearLayout
        xmlns:android=
        "http://schemas.android.com/apk/res/android"
        android:layout_width="match_parent"
        android:layout_height="wrap_content"
        android:paddingTop="1dip"
        android:paddingBottom="1dip"
        android:paddingStart="8dip"
        android:paddingEnd="8dip">
      
        <ImageView android:id="@+id/icon"
          android:layout_width="24dip"
          android:layout_height="24dip"
        />
      
        <TextView android:id="@android:id/text1"
          android:layout_width="wrap_content"
          android:layout_height="wrap_content"
          android:layout_gravity="center_horizontal"
          android:paddingStart=
          "?android:attr/listPreferredItemPaddingStart"
        />
      </LinearLayout>


      android.R.layout.simple_expandable_list_item_1
      Source Code: Git | SVN
      <?xml version="1.0" encoding="utf-8"?>
      <TextView
        xmlns:android=
        "http://schemas.android.com/apk/res/android"
        android:id="@android:id/text1"
        android:layout_width="match_parent"
        android:layout_height=
        "?android:attr/listPreferredItemHeight"
        android:paddingStart=
        "?android:attr/expandableListPreferredItemPaddingLeft"
        android:textAppearance=
        "?android:attr/textAppearanceListItem"
        android:gravity="center_vertical"
      />


      android.R.layout.simple_expandable_list_item_2
      Source Code: Git | SVN
      <?xml version="1.0" encoding="utf-8"?>
      <TwoLineListItem
        xmlns:android=
        "http://schemas.android.com/apk/res/android" 
        android:layout_width="match_parent"
        android:layout_height=
        "?android:attr/listPreferredItemHeight"
        android:paddingTop="2dip"
        android:paddingBottom="2dip"
        android:paddingStart=
        "?android:attr/expandableListPreferredItemPaddingLeft"
        android:mode="twoLine"
      >
      
        <TextView android:id="@android:id/text1"
          android:layout_width="match_parent"
          android:layout_height="wrap_content"
          android:layout_marginTop="6dip"
          android:textAppearance=
          "?android:attr/textAppearanceListItem"
        />
      
        <TextView android:id="@android:id/text2"
          android:layout_width="match_parent"
          android:layout_height="wrap_content"
          android:layout_below="@android:id/text1"
          android:layout_alignStart="@android:id/text1"
          android:textAppearance=
          "?android:attr/textAppearanceSmall"
        />
      
      </TwoLineListItem>


      android.R.layout.simple_list_item_1
      Source Code: Git | SVN | Download Zip | Tutorial
      <?xml version="1.0" encoding="utf-8"?>
      <TextView
        xmlns:android=
        "http://schemas.android.com/apk/res/android"
        android:id="@android:id/text1"
        android:layout_width="match_parent"
        android:layout_height="wrap_content"
        android:textAppearance=
        "?android:attr/textAppearanceListItemSmall"
        android:gravity="center_vertical"
        android:paddingStart=
        "?android:attr/listPreferredItemPaddingStart"
        android:paddingEnd=
        "?android:attr/listPreferredItemPaddingEnd"
        android:minHeight=
        "?android:attr/listPreferredItemHeightSmall"
      />


      android.R.layout.simple_list_item_2
      Source Code: Git | SVN | Download Zip | Tutorial
      <?xml version="1.0" encoding="utf-8"?>
      <TwoLineListItem
        xmlns:android=
        "http://schemas.android.com/apk/res/android" 
        android:layout_width="match_parent"
        android:layout_height="wrap_content"
        android:minHeight=
        "?android:attr/listPreferredItemHeight"
        android:mode="twoLine"
      >
          
        <TextView
          android:id="@android:id/text1"
          android:layout_width="match_parent"
          android:layout_height="wrap_content"
          android:layout_marginStart=
          "?android:attr/listPreferredItemPaddingStart"
          android:layout_marginTop="8dip"
          android:textAppearance=
          "?android:attr/textAppearanceListItem"
        />
      
        <TextView
          android:id="@android:id/text2"
          android:layout_width="match_parent"
          android:layout_height="wrap_content"
          android:layout_below="@android:id/text1"
          android:layout_alignStart="@android:id/text1"
          android:textAppearance=
          "?android:attr/textAppearanceSmall"
        />
      
      </TwoLineListItem>
      

      2013-03-04

      One simple trick to make WebLogic admin easier

      Setting well-known WebLogic paths as Unix environment variables can make daily administration easier. For example,

      export WLHOME=/home/weblogic/Oracle/Middleware/user_projects/domains/base_domain
      export WLBIN=${WLHOME}/bin
      export WLLOG=${WLLOG}/servers/AdminServer/logs

      This is preferable to using Unix aliases such as

      alias gotolog='cd /home/weblogic/Oracle/Middleware/user_projects/domains/base_domain/servers/AdminServers/logs'

      Benefits
      • Easy to navigate
        Being able to quickly and easily switch between any WebLogic log and bin directory via
        cd $WLLOG
        cd $WLBIN

        makes production debugging much less stressful than fumbling around Oracle WebLogic notoriously long and nested directory structures. This is especially important when you are debugging a real-time production issue on multiple WebLogic Unix servers with your eight bosses watching over your shoulders.

      • Flexible and reusable
        The environment variables can be used in a number of situations.
        cd $WLLOG
        tail -f $WLLOG/AdminServer.log
        ls $WLLOG
        tar cvf archiveLogs.tar $WLLOG


      • Usable by developers
        Java developers can get the Unix environment variable via
        System.getenv("WLLOG");
        They can also directly use it in their bash shell scripts. This makes the same code portable across multiple WebLogic domains and environments without having to modify their code.

      • Self-documenting
        Other admins can type
        set | grep "^WL"

        and see the real paths for WebLogic. This is helpful if you have to change WebLogic directories or are on a unfamiliar server.

      2013-03-03

      Ignore Git

      • How do I find the global ignore configuration file?
        git config --get-all core.excludesfile

        (In svn, the global ignore configuration file is al
        ways ~/.subversion/config)

      • How do I create a global ignore file if one is not configured?
        git config --global core.excludesfile ~/.gitignore_global

        (In svn, just create the text file ~/.subversion/config)

      • What do I put in the global ignore configuration text file?
        You can find examples of .gitignore_global at
        https://github.com/github/gitignore/tree/master/Global

        (In svn, just add this line into ~/.subversion/config
         global-ignores = *.o *.lo *.la *.al .libs *.so *.so.[0-9]* *.a *.pyc *.pyo  *.rej *~ #*# .#* .*.swp .DS_Store *.class
        )

      • How do I configure ignores specific to a project?
        In the project directory, you can create or edit either the file .git/info/exclude or .gitignore. It has the same format as the global ignore.

        (In svn,
        Configure .svnignore as local ignore file:
        svn propset svn:ignore -F .svnignore /path/to/svn/workspace

        Configure just one ignore:
        svn propset svn:ignore "files_to_ignore" /path/to/svn/workspace

        Configure a group of ignores:
        svn propedit svn:ignore /path/to/svn/workspace

        View what is ignored
        svn propget svn:ignore /path/to/svn/workspace
        )

      2013-03-02

      Android Project .gitignore

      # built application files
      *.apk
      *.ap_
      
      # files for the dex VM
      *.dex
      
      # Java class files
      *.class
      
      # generated files
      bin/
      gen/
      
      # Local configuration file (sdk path, etc)
      local.properties
      
      # Eclipse project files
      .classpath
      .project
      .settings/
      .metadata/
      
      # Proguard folder generated by Eclipse
      proguard/
      
      # Intellij project files
      *.iml
      *.ipr
      *.iws
      .idea/
      
      # PMD files
      .pmd
      reports/
      
      # SVN files
      .svn/
      
      # Mac OS X
      .DS_Store
      

      Unix Environment Variables

      • How do I show all my environment variables?
        set

      • How do I show a specific environment variable, like PATH?
        set | grep -e "^PATH="

      • How do I set an environment variable, like ORACLE_HOME?
        export ORACLE_HOME=/usr/oracle

      • How do I delete a environment variable?
        unset ORACLE_HOME

      • How do I append to an environment variable, like appending /users/sbin to PATH?
        export PATH=${PATH}:/users/sbin

      • How do I reuse other environment variables, like adding ORACLE_HOME to PATH?
        export PATH=${PATH}:${ORACLE_HOME}

      • How do I pass environment variables to Unix shell scripts without changing my environment?
        PATH=${PATH}:/usr/local ./myShellScript.sh

      • How do I make my changes to environment variables permanent?
        Create or edit the file ~/.bashrc and add the export command to that file. For example, to make the change to ORACLE_HOME permanent, add the following line to ~/.bashrc
        export ORACLE_HOME=/usr/oracle

        After saving the file ~/.bashrc, then execute the command
        source ~/.bashrc

      • What is the difference between ~/.bash_profile and ~/.bashrc? Or setting ~/.bashrc did not make my environment variable changes permanent.
        For a detailed explanation, please read Josh Staiger's article.

        But pragmatically it doesn't matter. Just make ~/.bash_profile execute ~/.bashrc. Create or edit ~/.bash_profile and add the following line
        [ -r ~/.bashrc ] && . ~/.bashrc